
The fax test failed
If you ran a fax test and the test failed, review the report for basic information about the error. For
more detailed information, check the report to see which part of the test failed, and then review the
appropriate topic in this section for solutions to try.
The "Fax Hardware Test" failed
●
Turn the printer off by pressing (the Power button) located on the printer control panel and
then unplug the power cord from the back of the printer. After a few seconds, plug the power
cord in again, and then turn the power on. Run the test again. If the test fails again, continue
reviewing the troubleshooting information in this section.
●
Try to send or receive a test fax. If you can send or receive a fax successfully, there might not be
a problem.
●
If you are running the test from the Fax Setup Wizard (Windows) or HP Utility (OS X), make sure
the printer is not busy completing another task, such as receiving a fax or making a copy. Check
the display for a message indicating that the printer is busy. If it is busy, wait until it is finished
and in the idle state before running the test.
●
Make sure you use the phone cord that came with the printer. If you do not use the supplied
phone cord to connect from the telephone wall jack to the printer, you might not be able to send
or receive faxes. After you plug in the phone cord that came with the printer, run the fax test
again.
●
If you are using a phone splitter, this can cause faxing problems. (A splitter is a two-cord
connector that plugs into a telephone wall jack.) Try removing the splitter and connecting the
printer directly to the telephone wall jack.
After you resolve any problems found, run the fax test again to make sure it passes and the printer is
ready for faxing. If the Fax Hardware Test continues to fail and you experience problems faxing,
contact HP support. Go to www.hp.com/support. This website provides information and utilities that
can help you correct many common printer problems. If prompted, select your country/region, and
then click All HP Contacts for information on calling for technical support.
The "Fax Connected to Active Telephone Wall Jack" test failed
●
Check the connection between the telephone wall jack and the printer to make sure the phone
cord is secure.
●
Make sure you use the phone cord that came with the printer. If you do not use the supplied
phone cord to connect from the telephone wall jack to the printer, you might not be able to send
or receive faxes. After you plug in the phone cord that came with the printer, run the fax test
again.
●
Make sure you have correctly connected the printer to the telephone wall jack. Using the phone
cord supplied in the box with the printer, connect one end to your telephone wall jack, then
connect the other end to the port labeled 1-LINE on the back of the printer.
Learn more about fax setup and test, click here to go online for more information.
●
If you are using a phone splitter, this can cause faxing problems. (A splitter is a two-cord
connector that plugs into a telephone wall jack.) Try removing the splitter and connecting the
printer directly to the telephone wall jack.
ENWW
Solve fax problems 99
●
Try connecting a working phone and phone cord to the telephone wall jack that you are using for
the printer and check for a dial tone. If you do not hear a dial tone, contact your telephone
company and have them check the line.
●
Try to send or receive a test fax. If you can send or receive a fax successfully, there might not be
a problem.
After you resolve any problems found, run the fax test again to make sure it passes and the printer is
ready for faxing.
The "Phone Cord Connected to Correct Port on Fax" test failed
Make sure you use the phone cord that came with the printer. If you do not use the supplied phone
cord to connect from the telephone wall jack to the printer, you might not be able to send or receive
faxes. After you plug in the phone cord that came with the printer, run the fax test again.
If you are using a phone splitter, this can cause faxing problems. (A splitter is a two-cord connector
that plugs into a telephone wall jack.) Try removing the splitter and connecting the printer directly to
the telephone wall jack.
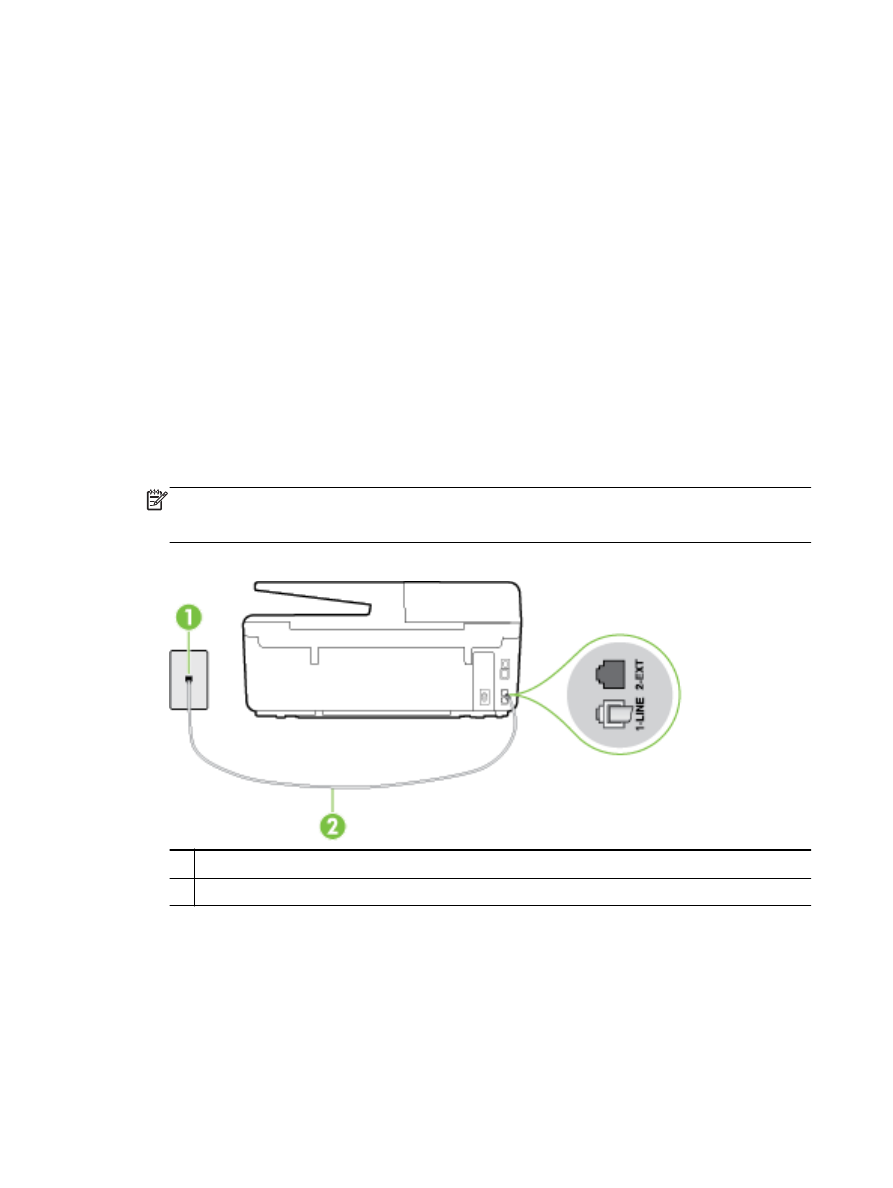
Plug the phone cord into the correct port
1.
Using the phone cord supplied in the box with the printer, connect one end to your telephone
wall jack, then connect the other end to the port labeled 1-LINE on the back of the printer.
NOTE: If you use the 2-EXT port to connect to the telephone wall jack, you cannot send or
receive faxes. The 2-EXT port should only be used to connect other equipment, such as an
answering machine.
Figure 10-1 Back view of the printer
1
Telephone wall jack
2
Use the phone cord supplied in the box with the printer to connect to the "1-LINE" port
2.
After you have connected the phone cord to the port labeled 1-LINE, run the fax test again to
make sure it passes and the printer is ready for faxing.
3.
Try to send or receive a test fax.
100 Chapter 10 Solve a problem
ENWW
The "Using Correct Type of Phone Cord with Fax" test failed
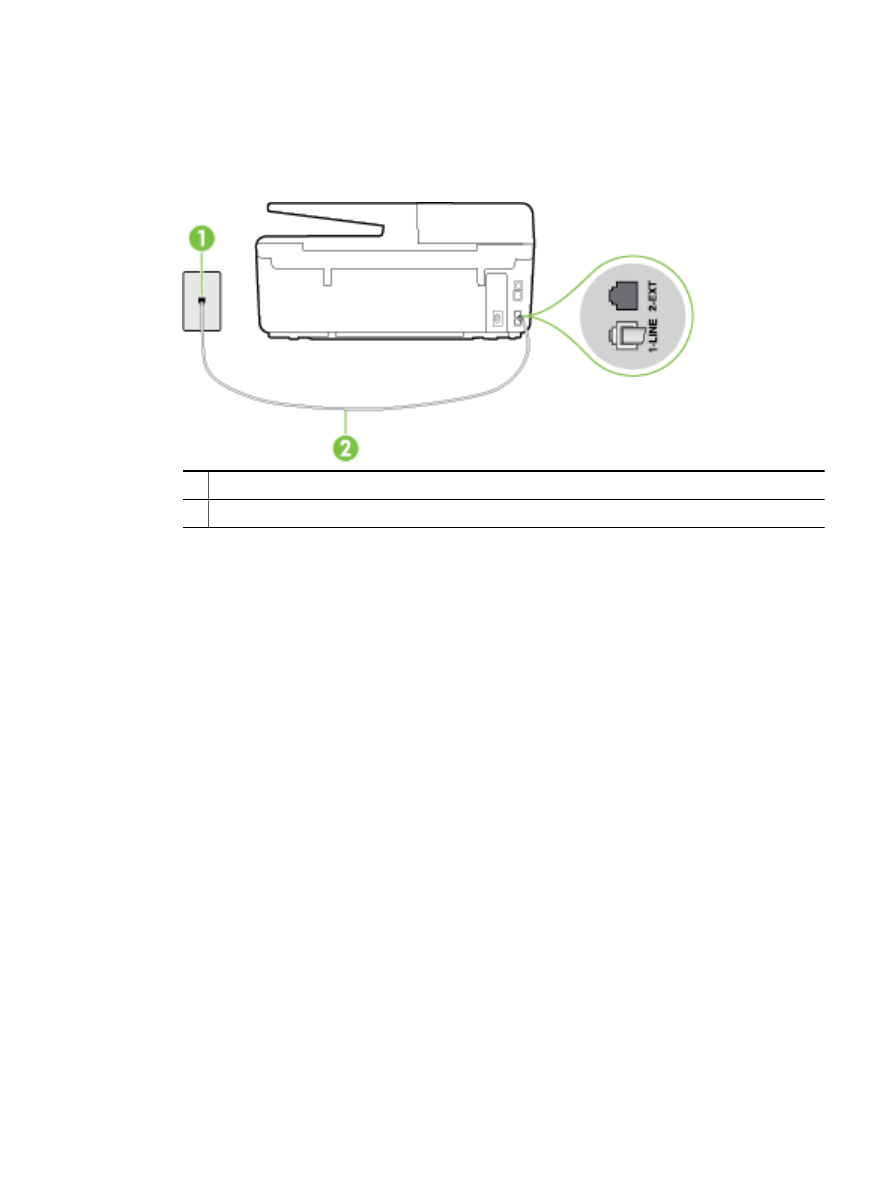
●
Make sure you used the phone cord supplied in the box with the printer to connect to the
telephone wall jack. One end of the phone cord should be connected to the port labeled 1-LINE
on the back of the printer, and the other end to your telephone wall jack, as shown in the
illustration.
1
Telephone wall jack
2
Use the phone cord supplied in the box with the printer to connect to the "1-LINE" port
If the phone cord that came with the printer is not long enough, you can use a longer 2-wire
phone cord to extend the length. You can purchase the cord at an electronics store that carries
phone accessories.
●
Check the connection between the telephone wall jack and the printer to make sure the phone
cord is secure.
●
Make sure you use the phone cord that came with the printer. If you do not use the supplied
phone cord to connect from the telephone wall jack to the printer, you might not be able to send
or receive faxes. After you plug in the phone cord that came with the printer, run the fax test
again.
●
If you are using a phone splitter, this can cause faxing problems. (A splitter is a two-cord
connector that plugs into a telephone wall jack.) Try removing the splitter and connecting the
printer directly to the telephone wall jack.
The "Dial Tone Detection" test failed
●
Other equipment, which uses the same phone line as the printer, might be causing the test to
fail. To find out if other equipment is causing a problem, disconnect everything from the phone
line, and then run the test again. If the Dial Tone Detection Test passes without the other
equipment, then one or more pieces of the equipment is causing problems; try adding them back
one at a time and rerunning the test each time, until you identify which piece of equipment is
causing the problem.
●
Try connecting a working phone and phone cord to the telephone wall jack that you are using for
the printer and check for a dial tone. If you do not hear a dial tone, contact your telephone
company and have them check the line.
ENWW
Solve fax problems 101

●
Make sure you have correctly connected the printer to the telephone wall jack. Using the phone
cord supplied in the box with the printer, connect one end to your telephone wall jack, then
connect the other end to the port labeled 1-LINE on the back of the printer.
●
If you are using a phone splitter, this can cause faxing problems. (A splitter is a two-cord
connector that plugs into a telephone wall jack.) Try removing the splitter and connecting the
printer directly to the telephone wall jack.
●
If your telephone system is not using a standard dial tone, such as some private branch
exchange (PBX) systems, this might cause the test to fail. This does not cause a problem
sending or receiving faxes. Try sending or receiving a test fax.
●
Check to make sure the country/region setting is set appropriately for your country/region. If the
country/region setting is not set or is set incorrectly, the test might fail and you might have
problems sending and receiving faxes.
●
Make sure you connect the printer to an analog phone line or you cannot send or receive faxes.
To check if your phone line is digital, connect a regular analog phone to the line and listen for
a dial tone. If you do not hear a normal sounding dial tone, it might be a phone line set up for
digital phones. Connect the printer to an analog phone line and try sending or receiving a fax.
●
Make sure you use the phone cord that came with the printer. If you do not use the supplied
phone cord to connect from the telephone wall jack to the printer, you might not be able to send
or receive faxes. After you plug in the phone cord that came with the printer, run the fax test
again.
After you resolve any problems found, run the fax test again to make sure it passes and the printer is
ready for faxing. If the Dial Tone Detection test continues to fail, contact your telephone company and
have them check the phone line.
The "Fax Line Condition" test failed
●
Make sure you connect the printer to an analog phone line or you cannot send or receive faxes.
To check if your phone line is digital, connect a regular analog phone to the line and listen for
a dial tone. If you do not hear a normal sounding dial tone, it might be a phone line set up for
digital phones. Connect the printer to an analog phone line and try sending or receiving a fax.
●
Check the connection between the telephone wall jack and the printer to make sure the phone
cord is secure.
●
Make sure you have correctly connected the printer to the telephone wall jack. Using the phone
cord supplied in the box with the printer, connect one end to your telephone wall jack, then
connect the other end to the port labeled 1-LINE on the back of the printer.
●
Other equipment, which uses the same phone line as the printer, might be causing the test to
fail. To find out if other equipment is causing a problem, disconnect everything from the phone
line, and then run the test again.
◦
If the Fax Line Condition Test passes without the other equipment, then one or more pieces
of the equipment is causing problems; try adding them back one at a time and rerunning
the test each time, until you identify which piece of equipment is causing the problem.
◦
If the Fax Line Condition Test fails without the other equipment, connect the printer to
a working phone line and continue reviewing the troubleshooting information in this section.
●
If you are using a phone splitter, this can cause faxing problems. (A splitter is a two-cord
connector that plugs into a telephone wall jack.) Try removing the splitter and connecting the
printer directly to the telephone wall jack.
102 Chapter 10 Solve a problem
ENWW

●
Make sure you use the phone cord that came with the printer. If you do not use the supplied
phone cord to connect from the telephone wall jack to the printer, you might not be able to send
or receive faxes. After you plug in the phone cord that came with the printer, run the fax test
again.
After you resolve any problems found, run the fax test again to make sure it passes and the printer is
ready for faxing. If the Fax Line Condition test continues to fail and you experience problems faxing,
contact your telephone company and have them check the phone line.